Pages

Thursday, October 6, 2016

Lesson 3: Summary

Lesson 3: Summary


Concepts:
  1. A structured way of working – the seven-step process.
  2. The power of guidelines - alignment, centerlines, horizontal ledges, and adjustments for thicknesses.
  3. Some measuring tips for getting better proportions - look for squares, use a basic unit of measure, and measure between guidelines.
Observations:
  • The most important takeaway from this week was the realization of the importance and benefit of understanding the structure and design of a building before drawing it. Shapes, angles, and proportions are based on structure and design. Analysis pluses intuition. Understanding the anatomy of a building helps when you draw it, and drawing helps you understand how a building is put together.
  • Measuring always takes longer than just going for it in ink. It's the old problem of speed versus accuracy. If you have the time, however, it is really worth it to do a setup.
  • It's remarkable how just a few well placed setup lines can speed up the process and make such a world of difference in the finished sketch.
  • Buildings look wonky when vertical lines aren't vertical and horizontal lines aren't horizontal. I need to pay attention to drawing straight verticals and horizontals.
  • An advantage of doing a setup is that it is a good warmup exercise. It gets both observational skills and hand-eye coordination going before you draw with ink.
  • Working on location is more problematic than working in the studio.
  • Many building spaces are divided by thirds.
Questions:
  • Can you recommend a visual dictionary of architecture for artists?
To-Do:
 Work on verticals and horizontals.
 Make a few important horizontal and vertical setup lines using a ruler and then use those as guides for other lines when drawing with ink.
 Practice analyzing building structure and design.
 Check setup against the building or a photo and make corrections to the setup before starting to draw with ink.

Jim

Lesson 3: Outdoor Exercise, Adolph Block

Lesson 3: Outdoor Exercise, Adolph Block

Adolph Block watercolor
I drove downtown (Salem, Oregon) and parked across State Street from the Adolph Block building which was built in 1880. It was a cold and rainy morning, so, I sketched from inside my car. Parking on this street is diagonal parking, not parallel. I had to turn and look back from the driver's seat to see the building. Holding my large journal and handling my supplies was difficult in the cramped space that I had.

I took a reference picture with my iPod Touch and used it to analyze the building's design. I did a quick pencil sketch on a small piece of paper. The building is three sets of squares top and bottom with a small piece added onto the right side which I assume is a stairway to the second floor. I also determined the placement of the windows and doors. The top story windows are three to a square, are the same size, and are spaced evenly. The first floor is divided in half vertically with windows above and entrances and display windows below. I also used three dots to find the height and width of the triangular shaped tree foliage.

5 step sketch
I then used this knowledge to draw setup lines in my journal. I drew with a Pilot erasable FriXion orange highlighter pen. Next I used a Kaweco Sport fountain pen with Platinum Carbon Black ink to draw the details over the setup. All this took about an hour. I ran out of time and energy and had to stop before I could add the watercolor.

I used a hair dryer at home to erase the orange highlighter pen, and then added watercolor while looking at the reference photo I had taken on my iPod Touch blown up large on my desktop computer's monitor. I used Daniel Smith watercolor and two brushes - a 5/8 inch filbert to start and a #6 round for added detail. I worked in successive steps of color from light to dark. I used a hair dryer between each pass to speed things up.

Working on location is more problematic than working in the studio. In this case I couldn't see very well through the rain on the car window. I misjudged the placement of the halfway line between the stories which made the top story windows too long and the ground level windows and doors too short. I should have caught that by comparing the setup sketch with the building or photo, but I didn't. Next time I'll try to remember to check before adding ink.

Jim

Lesson 3: Indoor Exercise 2, Capitoline Hill, Rome

Lesson 3: Indoor Exercise 2, Capitoline Hill, Rome

We worked from a supplied photo reference. Again we were to work through the drawing using the lesson concepts - a structured way of working, guidelines, and measuring to get better proportions.

I first did a setup sketch to lay the building out in my journal and set the proportions of the building pieces. I used a Pilot erasable FriXion orange highlighter pen so that I could later erase the setup lines.

I then added ink on top of the setup lines using a black Zebra disposable brush pen with a fine felt tip. I chose this pen because it is capable of making both fine and bold marks and because it is waterproof.

Capitoline Hill
Notice I adjusted the ink lines as I drew and didn't follow the orange guidelines if I thought the angle or proportion was wrong (for instance I adjusted the height of the tower and the angle of the right staircase).

Next I erased the orange setup highlighter lines with a hair dryer.

Capitoline Hill ink
Boy, that sure works great to get a clean drawing. It's much better than trying to erase pencil. You don't smudge the ink.

Finally I added watercolor. 

Capitoline Hill watercolor
I layed in the sky first (working wet-on-wet) with a 5/8 inch filbert brush and blotted out a few clouds with a tissue. I used the same brush to paint the light tan of the upper story. I then darkened the mix with a little cerulean blue to add the shadows. The small details were done with a #6 round brush.

Doing a measured setup solves a lot of problems and saves time because you don't have to do separate analytical pencil sketches to work out the proportions and placement of the major building elements. However, measuring always takes longer than just going for it in ink. It's the old problem of speed versus accuracy. If you have the time, however, it is really worth it to do a setup, because the more you know about the subject and its underlying structure and purpose, the better.

The other advantage of doing a setup is that it is a good warmup exercise. It gets both observational skills and hand-eye coordination going before you draw with ink. 

Jim

Lesson 3: Indoor Exercise 1, Notre Dame

Lesson 3: Indoor Exercise 1, Notre Dame

I first did a two minute sketch of the basic structure of the building. I used a  orange Pilot FriXion erasable highlighter pen so that I could later erase the setup lines using a hair dryer. The ink from this pen disappears with heat and re-appears with cold.

Notre Dame setup


Next I drew on top of the setup lines. I started using a yellow ochre colored pencil, but soon switched to using a Zebra disposable brush pen with a fine felt tip and black ink.

Notre Dame pen over setup


I then erased the setup lines with a hair dryer.

Notre Dame sans setup


The colored lines you see are the colored pencil lines I started drawing before switching to ink.

Finally I finished with colored pencil.

Notre Dame colored pencil

It's remarkable how just a few well placed setup lines can speed up the process and make such a world of difference in the finished sketch.

Jim

Monday, October 3, 2016

Lesson 3: Overview

This week we are taking a different approach. Up to now we have been working with shapes and volumes. We have been drawing what we see. The approach this week is to study and discover the underlying structure of the building and the architectural design and to base our drawings on our understanding of the building.

Concepts this week include:

  1. A structured way of working – the seven-step process.
  2. The power of guidelines - alignment, centerlines, horizontal ledges, and adjustments for thicknesses.
  3. Some measuring tips for getting better proportions - look for squares, use a basic unit of measure, and measure between guidelines.

We learned a seven step workflow. Not every step is need, but we always work in this order.

  1. Overall volumes/shapes
  2. Proportions
  3. Main structure and stories
  4. Rhythm of windows and other elements
  5. Window frames
  6. Openings and windows
  7. Details (decoration) and texture
We also learned how to use guidelines, make adjustments for thicknesses, and how to measure lengths and angles.

Indoor Exercises:

Exercise 1: We did an analytical diagram of the structure of Notre Dame in Paris from a supplied photo reference. Then we did a more detailed sketch drawing on what we discovered in the initial diagram.

Exercise2: We did the same using a reference photo of Capitoline Hill in Rome.

Outdoor Exercise:

Our assignment was to sketch a local building that has at least two stories and a number of bays. I chose to draw the Adolf Block in downtown Salem.

Jim

Wednesday, September 28, 2016

Lesson 2: Summary

Lesson 2: Summary

Concepts:
  1. Adding and subtracting volumes.
  2. Allowing thicknesses and depths.
  3. Using leading edges.
Observations:
  • Working from the top down can be problematic. If you don't get the angles and proportions of the roof right, the rest of the building will not be right either.
  • I'm still making the windows too big.
  • It's hard to balance accuracy and spontaneity.  Drawing carefully slows you down and makes the lines look too stiff and stilted.
  • My indoor drawings improved as I went and helped a lot when I did the outdoor drawings.
  • The leading edges technique works with other subjects.
Questions:
  • Should I return to the same location to finish the sketch (add watercolor)?
To-Do:
 Work bigger.
 Work faster.
 Try using erasable highlighter for set  up and layout.
 Measure basic vertical and horizontal distances and compare relative sizes.
 Find the midway points of basic shapes.
 Make angles steeper. Compare angles to clock.
 Draw windows smaller.
 Write in all caps.

Jim

Lesson 2: Outdoor Exercise 2

Lesson 2: Outdoor Exercise 2

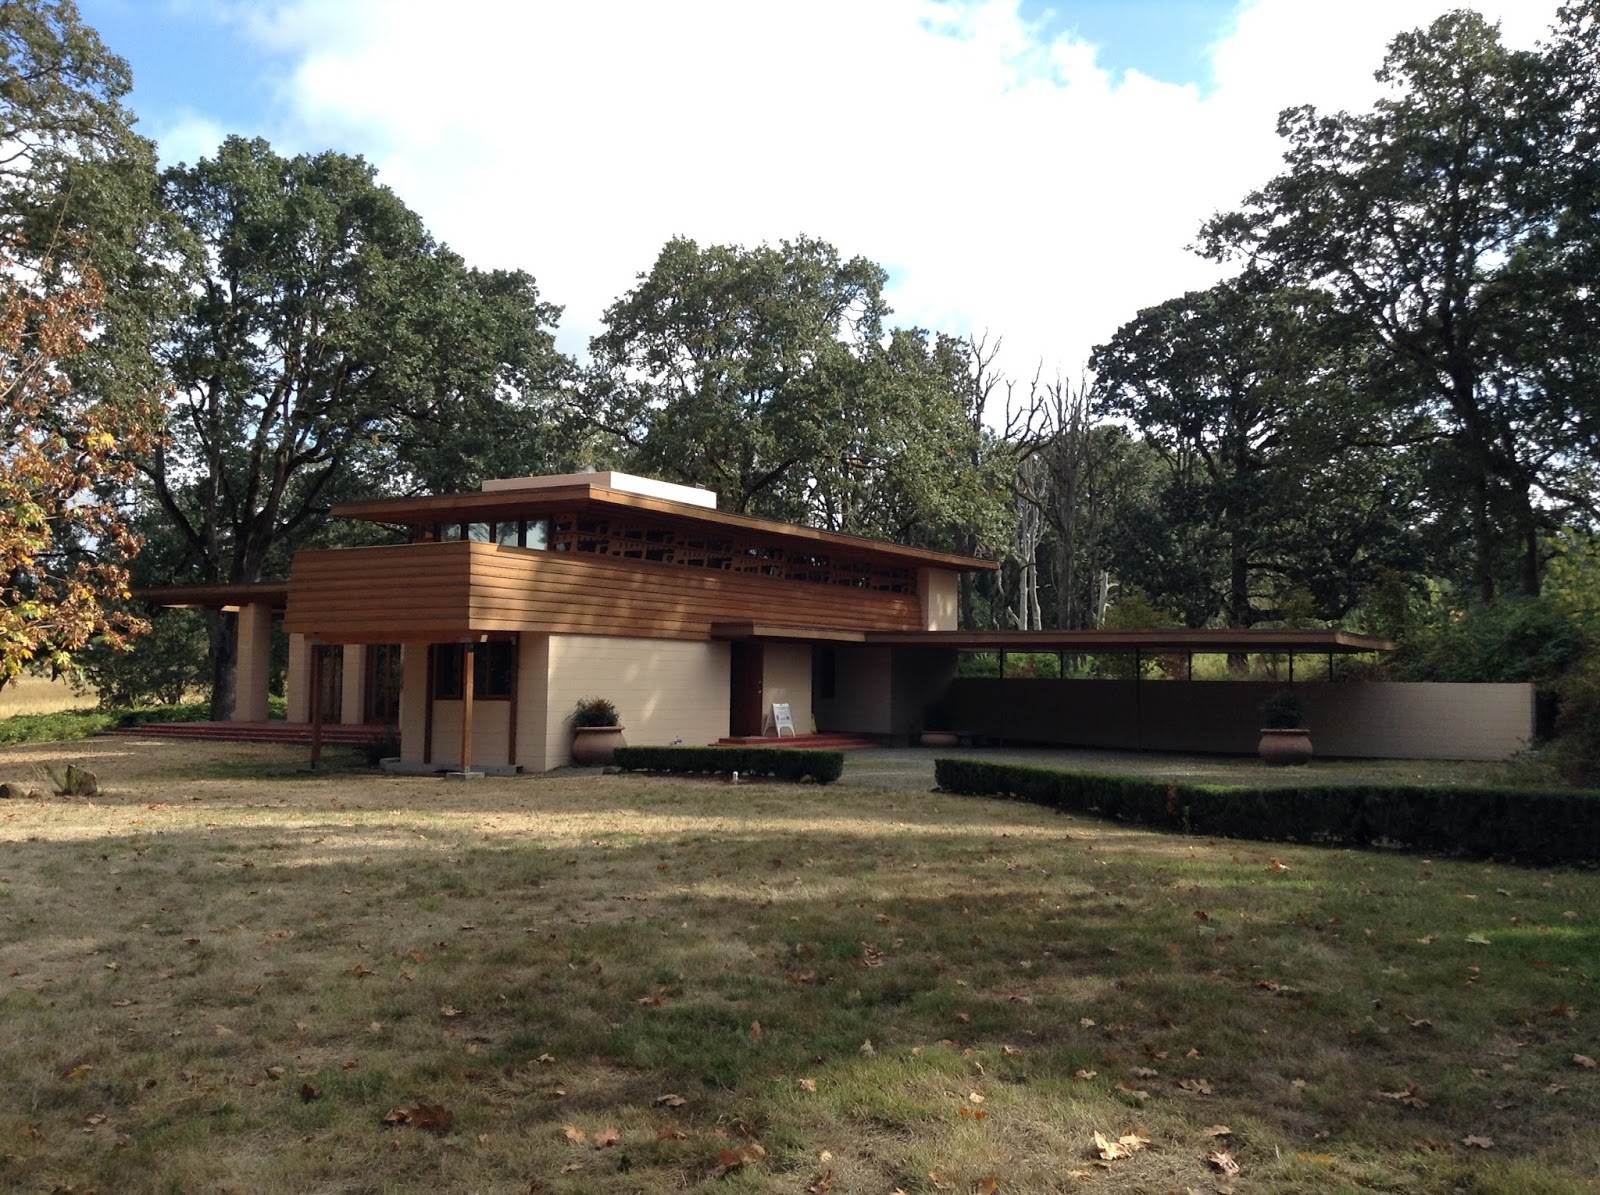
I drove to Silverton and sketched the Gordon House this morning.

Gordon house finished drawing
Finished Drawing

It was cold and mostly cloudy. I sat there for almost two hours looking at this house and figuring it out on paper and then sketching it. My goal this time out was to produce a measured drawing getting the proportions and angles right and my lines straight and controlled. When you are on location, you have to figure out where on the "sketch vs finished drawing" spectrum you want to be. I wanted to try an accurate drawing at the far end of the spectrum.

I started with a thumbnail sketch done in pencil of the basic volumes. I used the front left facing wall as a unit of measurement (A) and compared the other widths and heights to it on my initial sketch. The left hand side was way too long as drawn.

Working drawing
Small thumbnail working drawing in pencil to figure out the volumes and proportions.


I then turned the page and laid out the building across both pages using pencil and then I inked in with a Micron Pigma 02 pen. Finally I added the shapes of some of the trees in the background and the small hedge in the foreground.

I was getting cold and tired and ran out of energy. I quickly added the complicated shaped windows on the second floor, packed up my gear, and headed for lunch.

Later I noticed that I had missed a few elements of the structure - the left hand support pillar for the cantilevered second floor porch and the right hand support post for the car port. I would like to come back and finish by adding watercolor.

Proportions and angles are good. The length of the car port is short by about a quarter. Other than that, I think this is a good representation of the building.

My skill at drawing long lines straight is getting better if I am careful and turn the paper. I used two methods. I drew one or two lines in pencil using a ruler and judged where to draw parallel lines in ink based on the pencil line. I also drew dots at the end points and drew dot to dot.

Materials: Strathmore large softcover journal, pencil, Micron Pigma 02 pen.

Gordon House is the only building in Oregon that was designed by Frank Lloyd Wright. It was one of his Usonian houses and used to sit on a hill overlooking the Willamette River. The house was saved from near destruction in 2000 and moved to its present site in the Oregon Garden near Silverton, Oregon.

The house is most often pictured from the left side and is indeed beautiful from every side.

The posts and beam holding up the cantilevered second story porch were added a few years ago. I don't know the story behind why they were added. I assume they are a temporary fix because the ground shifted or they put the house back together again incorrectly, but they were not part of Wright's original design.

Gordon house

Gordon house

Jim


Lesson 2: Outdoor Exercise 1

Lesson 2: Outdoor Exercise 1

Our assignment was to sketch a house.
house 1

I actually did this drawing before I did the indoor exercises and it shows. I made many of the mistakes that Liz addresses in the indoor exercises. I got the angles of the roof wrong which made the proportions of the sides of the house wrong. I made the windows too large and the roof of the porch is too big. I was surprised by how difficult is was to draw a simple two story house. So, I learned a lot. You often learn more by attempting to do something before reading how to do it.

Materials: Canson Mix Media 7x10 inch spiral bound pad, pencil, Pentel EnerGel 0.5mm ball needle point liquid gel pen.

Jim

Lesson 2: Exercise 2, Thicknesses and Depths

Lesson 2: Exercise 2, Thicknesses and Depths

This exercises was all about thicknesses and depths. Again we worked from a photo reference. 
thicknesses and depths
We were to pay particular attention to the thicknesses of the beams and columns and the depth of the roof and windows.

Materials: Canson Mix Media 7x10 inch spiral bound pad, Zebra disposable brush pen extra fine nib.

Jim

Lesson 2: Exercise 1B, Volumes and Accuracy

Lesson 2: Exercise 1B, Volumes and Accuracy

In this exercise we were to revisit one of our four 1A drawings.
revisiting exercise 1A
I re-did the first example. I added a little more window detail and some context.

Materials: Canson Mix Media 7x10 inch spiral bound pad, Zebra disposable brush pen extra fine nib.

Jim